Saturday, December 25, 2010

Tuscan Mushrooms

It came to my attention this afternoon that I needed to have an appetizer dish for a Christmas party tomorrow.   I don't know how to do appetizers, I know meals.  Thankfully, I have books that tell me things like this.  I knew that New Italian Favorites had a nice chapter dealing with pre-meal eats, so I flipped through the chapter and looked for a recipe that had three characteristics: it could be served cold or room temperature, it had to be simple, and it had to taste good.  I decided on the Tuscan Mushrooms.

Giada never really explained why these mushrooms were particularly "Tuscan", so I can assume it's the type of ingredients.  The stuffing consists of jarred roasted red bell peppers, green olives (no pits or other junk), Romano cheese, and green onions.  I had never heard of roasted red bell peppers in a jar, so I knew it would be an interesting search in the rush before Meijer closed this evening at 7.  The shopping trip went relatively well, with me only having to ask assistance for basil and the peppers.  There is a constant shortage at my Meijer on fresh basil; as for the peppers, two guys ended up helping me search up and down the isles.  They both knew that Meijer had it in stock, so it was simply a matter of where.  "They don't tell us about when they move stuff; the least they could do is send us an email about it."  I replied, "Well, considering how much stock your store has, I'm pretty sure your inbox would be full very quickly."

The roasted peppers were interesting to dice, as their shape didn't resemble the common bell pepper shape we all know and love; rather, they looked like the body of a cleaned squid.  I chopped up the green olives (which I halved the amount because of my own dislikes) and green onions, and added Romano cheese, salt and pepper, and mixed it all together.  The mixture tasted interesting, with a strong brine flavor.

I purchased mushrooms that were labeled as stuffing mushrooms, thinking these would be more convenient in some way. Really, the only difference between them and regular button mushrooms is the size.  I think I like the stuffing mushrooms better, more room for, you guessed it, stuffing.

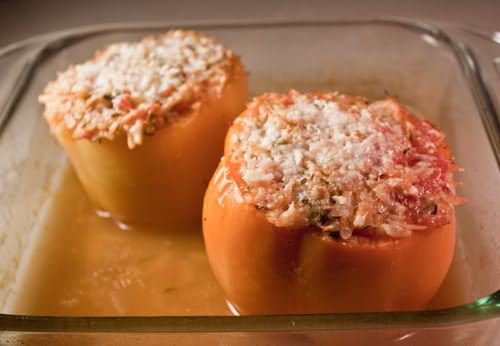
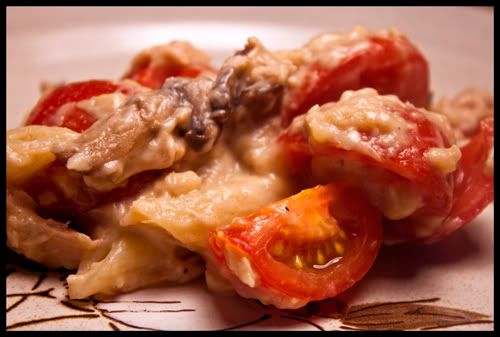
I arranged my 7 large mushrooms on a baking sheet, and baked them for 20 minutes.


They turned out looking AMAZING.  I love the colors and textures.  They tasted pretty darn good too.  Jeff and I found that if we sliced them in half, they were more manageable to eat, rather than attempting to control the stuffing with our mouthes while we chewed.  They also looked pretty neat sliced in half, but I didn't get pictures of that.  Maybe next time.

So, we'll see how well they go over at the party tomorrow...fingers crossed.  I hate doing things so very last minute like this, but I'm pleased the mushrooms turned out so well.

Tuscan Mushrooms

Ingredients
1/2 cup jarred roasted red bell peppers, diced
1/4 cup green olives, pitted and diced
1/2 cup Romano cheese, freshly grated
2 green onions, white only, finely chopped
1/2 teaspoon salt
1/4 teaspoon black pepper
14oz white button stuffing mushrooms, stemmed
1/4 cup basil, finely chopped

Preheat oven to 400 degrees; line a rimmed baking sheet with parchment paper.
Mix peppers, olives, cheese, green onions, salt, and pepper in a bowl.
On the baking sheet, arrange the mushrooms gill side up.
Spoon the filling into the mushrooms, mounding it slightly.
Bake until mushrooms are tender, about 20 minutes.
Top with basil and serve.

Thursday, December 23, 2010

Whole Wheat Linguine with Mushrooms, Ricotta, and Lemon, Take 2

I tried the recipe again, this time using shiitake mushrooms in the place of the green beans.  Certainly nowhere near as colorful as a photo.


Unfortunately, it wasn't as flavorful either.  The shiitakes added a woody flavor to an already woody dish.  It really made me appreciate what green beans added to the dish.  I think if I added button mushrooms rather than shiitakes it could add a brighter flavor.  It will be something to try.

Peppermint Ice

One of the traditional holiday things my mom would do is to make a type of candy I favored called peppermint ice.  It's essentially a peppermint bark, but I didn't know what bark (in the food sense) was back then.  For the past few years, I've made batches of these wrapped up in pretty paper to give to my department at school, and everyone (except you, Steve) seems to really like it.

For this year's batch, I was determined, for the sake of record keeping, to create a more accurate recipe card.  The two ingredients that are used to create this bark is white chocolate and "starlight kisses", which are little mints that are striped with red.  The packages I've found are labeled starlight mints.  The recipe asks for 2 pounds of white almond bark candy.  A more accurate ingredient is white baking chocolate, which is available in the baking isle.  All they have is white or milk chocolate, nothing labeled anything to do with almonds.  Next, the recipe calls for 2 packages starlight kisses.  That's...vague.  So, I called up my mom to ask how much 2 packages was supposed to be.  She told me that it was however much I felt like putting in.  Not exactly helpful, but better than nothing; it simply meant I had to guesstimate and improve from there.  I decided to use a ratio of 8.5 oz of mints to 1lb of chocolate (the package I had leftover from last year was 8.5oz, so it was convenient).

The first step was to "crush the peppermint candy into fine pieces".  I prefer using a food processor, or a blender.  After about 10 seconds of really loud pulsing, the mints are pulverized into a powder, which if you take off the lid too quickly, the particles can go into the air, and it's not fun to breath in peppermint dust.  (I speak from experience.)  I like some chunks in my candy, so I don't pulverize the mints completely.  I usually have to fish out some of the bigger chunks and save them for the next batch to be blended.

The next step is to melt the chocolate.  On the package there are usually instructions for melting in the microwave, which is what my mom did.  It's certainly an easier route, but I like using a double boiler to melt it.  I feel more involved that way.

I made a diagram to help explain how a double boiler works:


I melted the chocolate until it came to an amazingly creamy consistency.  At this point, there's the option to add a few drops of red food coloring, however I think that the light pink hue that the mints give the chocolate is plenty.  (And my red food coloring has gone missing, so I had to settle for not adding any.)  Now it was time to add the peppermint.  I found that it was easier to mix it in batches, somewhat like adding flour when making cookies, and then folding it in to the chocolate until well combined.  Then, after placing a sheet of wax paper on the counter, I poured the chocolate onto the sheet.  Using a spatula, I smoothed the chocolate out as thin as I can.  I've found that if I don't put effort into spreading the chocolate thin, it's really difficult to break after it hardens.  

Then, I waited two hours.  

When the chocolate hardened, I broke it into as small of pieces as I could manage without it being crumbs.  Then, I took this picture.


See?  Nice pink color, no food coloring needed.  

One of the other things I experimented with (I had to make 4lbs of the stuff, so I had the chance) was comparing whether it was easier to work with 2lbs of chocolate or 1lb at a time.  Not surprisingly, working with 1lb was the better option, although more time consuming.  

Peppermint Ice

Ingredients (makes approx. 21oz)
1lb white baking chocolate
8.5oz starlight mints

Pulverize the mints in a food processor or blender.
In a double boiler, melt the chocolate, stirring frequently.
Stir in the peppermint powder, and then pour the mixture onto a sheet of wax paper on a flat surface.
Let the candy harden for 2 hours, then break into small pieces.

Tuesday, December 21, 2010

Kielbasa and Shrimp Creole

Lots of new things with this recipe (which was taken from a Meijer card), both good and bad.  I got to work with two new things, kielbasa and creole.  Kielbasa is a type of Polish sausage, often packaged in a U shape.  Creole is a type of cuisine that originates from Louisiana, and takes concepts from French, Portugese, Spanish, African, and Native American cuisine.  Unfortunately for me, it's also known for being spicy.  Knowing this, I went light on the spicy spices the recipe called for.

The majority of the ingredients (kielbasa, onion, green bell pepper, celery, and spices), are cooked for 4 minutes, then I added the tomatoes, and brought the mixture to a boil.  I added the shrimp, and let it cook in the sauces, then served it over rice.  Nice and simple and sweet.


Except it wasn't sweet, it was still freakin' hot.  

My issue with spicy food is that I can't actually taste the food I'm eating, because my tongue is being burnt off.  I know I could get my senses used to the heat, but I don't care to spend the time on that, also considering spicy doesn't sit well with my stomach.  Anyways, I imagine if I could actually taste this dish it would be delicious.  I'm planning on retrying the dish without any spicy spices.

Monday, December 20, 2010

Rigatoni with Vegetable Bolognese

Another recipe from New Italian Favorites, featuring a vegetarian option with dried porcini mushrooms, carrots, onions, peppers, and red wine.  This was also the first recipe where I was able to use a newly purchased food processor!  In my experimentation with how to use it, I was determined to chop everything in this recipe with it.  I failed.

The recipe called for chopped thyme and oregano; unfortunately, herbs in such small quantities don't have enough weight for the spinning blades to actually chop them.  Luckily, the vegetables that the recipe called for chopping chopped fine, if not a little too fine.  One of the things I noticed consistently was that the food processor chopped everything into salsa-like bits, which is great...if you're trying to make salsa.  However, since I'm not making salsa, it's kind of a problem.

One of the new ingredients of which I had the pleasure of cooking with was dried porcini mushrooms.  They smelled like dog food, and when I soaked them in water as per instructions, it made the smell worse.

After all the prep, I cooked the vegetables and herbs until they were soft and tender.  Then, I added the drained porcini mushrooms and fresh mushrooms, and continued to cook.  Then, to complete the sauce, I added the mushroom liquid and red wine.  The dish was complete by mixing in pasta.


The taste of the vegetable mix was very interesting (the good kind of interesting).  I want to retry this recipe, but not using the food processor, so I might be able to taste more of the individual ingredients; otherwise, it's pretty close to being a final recipe for me.

Monday, December 6, 2010

Meatloaf, Take 2.

So, I looked on food.com (was recipezaar.com once), and looked through some of their most popular meatloaf recipes.  One of the things I have learned to do with online recipes is to not only search by ratings,  but to read a good number of the comments.  The comments often provide information regarding substitution, timing, even temperature variations that might be relevant.  Plus, there's the whole thing about opinions.  The meatloaf I ended up choosing was one that was baked for an hour and a half.  A long time, compared to the ten or twenty minute microwave meatloaf, but I had to be fair and follow directions before I modify.  The spice list on this thing was hefty, but promising.  Onion, parsley, worcestershire, chili powder, sage, and garlic powder.  And, the normal breadcrumbs compared to my quirky rice crispies.  It was also coated in a glaze of ketchup and brown sugar.

So, an hour and something later...


Pictures of meatloaf are difficult.  Attractive pictures, doubly so.  I do believe I improved from the previous meatloaf, if nothing else.

In preparation, I grabbed the salsa bottle if we needed an additional moisture component.  To my surprise, we didn't!  The taste was pretty darn magical...for a meatloaf.  Very moist, and the glaze added incredible flavor as well.  Now, the thing I want to know, is if I can create the same result with the same recipe, only microwaved.  Stay tuned.

Penne with Shrimp and Herbed Cream Sauce

Being another recipe from New Italian Favorites, I had high hopes for it.  I've been having a lot of luck with the dishes presented in the book, and I haven't even gone past the pasta section yet.  And, it's hard to go wrong with shrimp dishes.

The first thing to do, of course, was to cook the pasta.  Then, cook the shrimp with some garlic, and remove.  Then, I added canned tomatoes, basil, parsley, and a pinch of red pepper flakes and cooked.  After those were simmering, I added red wine, clam juice, and cream, and waited until the mixture came to a boil.  I let it simmer for about ten minutes, then added Parmesan cheese, the shrimp, and the pasta to the dish.

I've previously learned when I am cooking shrimp dishes where the shrimp will be cooked with the sauce after the initial cooking, I'll leave the shrimp partially uncooked.  That way, when they heat up in the pan again, they also finish cooking to the perfect amount, rather than being overcooked.  That's what I should have done with this.


The end result tasted good, but there was a lack of unity between the shrimp and the rest of the flavors.  The only way I can think of fixing this is to completely cook the shrimp in the sauce at the end of the cooking.  I'll give it a try.

Monday, November 29, 2010

Shells with Sausage, Beans, and Mascarpone, final take!

This dish with the maple sausage is fantastic.  The sausage has the perfect amount of flavor that blends so well with the oregano.


(I know, it's the same picture as before.  It still applies.)

Shells with Sausage, Beans, and Mascarpone

Ingredients (serves 2)
1.5oz small shell pasta
1/4 tablespoon olive oil
9 Bob Evans Maple Link Sausages, casings removed
1/3 cup onion, chopped
4 oz great northern beans, drained and rinsed
3/4 tablespoon fresh oregano leaves, chopped
1/6 cup mascarpone cheese
1/4 teaspoon salt
pinch pepper

Bring a pot of salted water to boil.
Add pasta and cook until al dente, according to box directions.
Drain pasta and reserve 1/6 cup of the water.
In a large skillet (not non-stick), heat olive oil over medium high heat.
Add the sausage and onion and cook, breaking up the sausage as it browns.
Cook until the sausage is just golden and the onion is tender.
Add the beans and oregano, and cook for 2 minutes.
Add the pasta water and stir.
Add the mascarpone cheese and stir until it dissolves into a light sauce.
Add the salt, pepper, and hot pasta, and stir until combined.

Swiss Meatloaf

When my mom used to make meatloaf, I recall having to smother it in ketchup and mustard and enjoying mixing the red and yellow together to make a funky orange.  Mind you, this is the memory I recall, not anything regarding the taste.  That's because my dad had something to do with what into the mixture, something involving french onion soup mixtures.  In the first cookbook I owned, there was a few different recipes for meatloaf that were cooked in the microwave instead of baked in the oven, so I was intrigued by the easy possibilities.

The other unique thing about this recipe is the fact that it has Rice Crispies instead of breadcrumbs.  The end taste from this isn't any different than using regular breadcrumbs, but it's a fun twist.  The other ingredients are relatively normal:  onion, garlic, mushrooms, Swiss cheese (which is, as far as I know, the only Swiss thing about this meatloaf; let me know if I'm wrong), an egg for binding, and of course, ground beef.  The original recipe had a coating of chili sauce and mustard, but I dont like chili sauce, so I switched it with salsa.  What can't salsa do?  (Also, don't mix salsa and mustard.  Bad bad idea.  I speak from experience.)


The thing I was amazed at when I first made this was how flavorful it was, compared to my previous meatloaf experiences.  Now, after having had more cooking experience, I found the taste to be sub-par.  So, I am currently searching online for popular meatloaf recipes, and I will find one to test.

Tuesday, November 23, 2010

Dill Cod

Back in the days of my early cooking, one of my go-to ideas was to find a sauce and cook a protein with it, and hope everything went well.  I found some gems from doing this, as well as plenty of mistakes.  I would often try to make educated pairings, such as fish with sauces that had lemon in them, and chicken, well, with anything else.  The most common fish I would use was tilapia, because it was cheap and simple.

I found a dill dressing somewhere, and paired the tilapia with it, adding some vegetables and pasta to make it more interesting.  The dill paired wonderfully with the fish, and it was a recipe I cooked occasionally for friends.

Fast forward to now, I no longer cook with tilapia.  I have since grown bored with it's flavorless taste, and moved on.  However, I wanted to do the recipe again, so I updated a few different things to bring it up to speed with my current skills.  The sauce originally contained vegetable oil, red wine vinegar, sugar, garlic powder, dry mustard, and dill weed.  The dill was the dry stuff, which is pretty powerful in itself, but I wanted to use fresh dill to see the true difference.  I kept the tomato, mushroom, and pasta pairing, but instead of using canned mushrooms, I sautéed the mushrooms beforehand.  And the most important change?  I switched the tilapia for cod, a fish I had worked with once before and, by golly, it had flavor.


Dill Cod

Ingredients: (2 servings)
1/2 cup vegetable oil
1/4 cup red wine vinegar
2 1/2 teaspoon sugar
1 teaspoon fresh dill, chopped
1/4 teaspoon salt
1/4 teaspoon garlic powder
1/4 teaspoon dry mustard
1/4 teaspoon black pepper
2 3-oz cod fillets
10 grape tomatoes, halved
2 ounces rotini pasta
8 ounces mushrooms

Saute mushrooms until almost soft, for ten minutes.  Do not crowd mushrooms.
Cook the pasta as directed.
Combine oil, vinegar, sugar, dill, salt, garlic powder, mustard, and pepper.
Put sauce into skillet, heat on medium high until simmering.
Cook cod in the sauce with the tomatoes, pasta, and mushrooms for 2 minutes on each side.

The most surprising part of this dish for me was how sweet  the pasta tasted.  The combination of the taste of the cod, tomatoes, mushrooms, and pasta made for a pleasantly complex meal.

Sunday, November 21, 2010

Stovetop Macaroni & Cheese

In the second part of my mac & cheese Alton Brown experience, I tried the stovetop version he presented.  Knowing that I already liked stovetop mac & cheese (in comparison to baked), I was eager.  Most of the same concepts presented in the baked version, such as the "secret ingredient" being an egg.  One of the other main differences was that hot sauce was added to the cheese sauce (or in my case, cayenne pepper, because apparently, the hot sauce that has been sitting on top of the refrigerator in a nice gift pack expired in 2008...)


I like this version better not only for the final taste, but also for the amount of time it takes to create.  Mix the egg, evaporated milk, hot sauce, dry mustard, salt, and pepper together; cook pasta, add butter, add egg mixture and cheese, and eat.  Quick enough for one sentence.

Two problems, though.
1)  The cheese.  I found a mild cheddar to use, but it wasn't sweet enough for my tastes.  I need to find a cheesemonger, or go to the farmers market and go samplin'.
2)  Pasta.  Not as big of a problem, simply personal preference.  I have never cared for elbow pasta, originating from the Kraft mac & cheese boxes I had as a kid.  For some reason, the elbow macaroni was never as tasty as the fun Pokemon shapes.  While reading a few food-related articles, I found that wheel-shaped pasta was excellent for mac & cheese as well.  Considering how close in concept this is to the shapes they make at Kraft, it should be true.

Sausage Sampler!

After waiting eagerly all week for the day to come, I finally had a chance to make an evening of sampling sausages.

Before cooking:


I chose four basic sausages from Meijer to sample:  Bob Evans Original Links, Bob Evans Maple Pork Sausage Links, Johnsonville Original Breakfast Sausage, and Johnsonville Vermont Maple Syrup Breakfast Sausage.  I decided to test out both the flavor and the technique of cooking it in the pan.  Ideally, I would have done a "blind taste test", but Jeff and I aren't biased enough to care.

After cooking:

All the sausage's casings were removed before cooking, to keep with the style of cooking the recipe has.

Johnsonville Original Recipe Breakfast Sausage:
I accidentally cooked this with too much oil, which I was able to drain for the most part.  For the cooking, I added it as whole sausages, then worked with my flat ended spoon to separate it, like ground beef.  The taste was good, and we figured it could absorb any flavors presented with it well.

Johnsonville Vermont Maple Syrup Breakfast Sausage:
Upon opening the package, I could immediately smell the maple syrup.  Instead of separating the sausage in the pan, I tried it beforehand in the bowl with a flat ended wooden spoon.  Upon placing it into the pan, I found I had to separate my patty of mashed sausage.  A bit more difficult than not having taken the time to mash it at all.  Lesson learned.  It had a very pleasant mild syrup taste to it.

Bob Evans Original Links:
Instead of mashing with a wooden spoon, I attempted to keep more of the air in the mixture by using a fork to separate the sausages.  I still had to re-separate the sausage in the pan, but it wasn't nearly as troublesome.  I think this method worked the best.   The sausage had a very basic taste.  Not bad, just basic.

Bob Evans Maple Pork Sausage Links:
These sausages I let keep their sausage-y forms for a longer period, until they were about 1/4 cooked.  This actually made it way harder to break up than any of the other attempts, because the cooked meat was binded to the other cooked meat.  This sausage was deemed the winner of the taste test.  Even though the taste wasn't as syrupy as the other brand's, it had a richer flavor than the Johnsonville sausages.

One of the more interesting things we noticed was that there was a definitive flavor difference between the two brands sampled. 

While I realize there are plenty of other sausages available to sample, I'm quite happy with the choice we made.  Now, all that's left is to try it with the recipe!

Tuesday, November 16, 2010

Whole Wheat Linguine with Green Beans, Ricotta, and Lemon

I always enjoy finding dishes that don't include meat in them, not because of dietary agendas, but because it means there is one less thing to prepare.  The tricky part is to find something that will make a stomach full the same way that meat will.  Pasta, thankfully, does the job fantastically, usually.

The titular recipe involves, as one could assume, pasta and green beans as the "meat" of the dish.  The pasta was cooked, then ricotta cheese was added to the drained linguine.  The instructions said to toss, but that was easier said than done.  Even though the pasta was hot, the cheese didn't exactly melt, partially because of the nature of ricotta, and the quickly cooling pasta.

Next up was the green beans, along with aromatics, cooked first with olive oil, then suedo steamed with pasta water added to the pan.  The coated pasta was then added to the pan along with tomatoes, and topped with lemon zest. 


The dish has a pleasant contrast of flavors; the lemon and the ricotta cheese worked with the other surprisingly well.  I thought that the green beans were perfectly cooked, and considering that I don't usually care for green beans because of their natural squeekyness, it's a good thing.  Jeff, however, still isn't fond of green beans, so I need to find a substitute.  Any suggestions for a green bean substitute?

Tuesday, November 9, 2010

Shells with Sausage, Beans, and Mascarpone, take three

I bought some sausage.  Normal breakfast sausage, those tiny little cute ones.  They were a bit tedious to unwrap from their casings, compared to the larger ones I've been dealing with, but it make it somewhat easier to break up in the pan when they were cooking.


By golly, they were flavorful!  All twelve of them.  I've determined that it's time to do something I hoped, out of tediousness, I would never have to do.  It's time to do a taste test.
You see, while the plain jane baby sausages I bought tasted flavorful, I only bought the normal variety.  There are tons and tons of varieties out there, and how am I supposed to know that the plain jane ones are the best, without testing the others?

So, next week, I am going to buy lots of sausage.  It's going to be ridiculous.

(Because my freezer isn't already full of leftover sausage...)


Also,
I made oatmeal.

Friday, November 5, 2010

Honey Mustard Chicken (Cheating)

Every week, I plan my meals and purchase the appropriate ingredients.  I make a good attempt to use the ingredients that will go bad the quickest, and freeze what I need to.  Usually I'm successful at using all my food in a timely manner, but sometimes...things happen.  I've found for a lot of fresh herbs, if I put them in water by a windowsill, they survive in nice condition.

Asparagus isn't a vegetable I like to use very much, but it's not the worst thing in my opinion, and is definitely something I'm looking to improve with.  Asparagus was one of the unusual ingredient's in last night's dinner, but, apparently, the way I stored it wasn't effective.  I experimented with having it out on the counter, by the windowsill, with the bases in water.  I bought them on Saturday, and was intending to use them on Thursday, so, five days.  What do I find on them?  Mold.  No go on dinner plan.

I had the chicken I needed for the dish thawed, so I wasn't about to give up on cooking for the night just yet.  What did I have that I could use?

Carrots, various herbs, and, salad dressing.

Salad dressing, you ask?

Why, yes.

You see, I keep a stock of some different types of salad dressings for days when I need to cook for just myself, and don't want to spend too much effort on anything in particular.  They're flavorful, and, when used correctly, can be awesome when combined with different meats.


I know, it doesn't look like much, but I can say with much certainty that I want to make this again.

I cut the chicken into pieces, chopped a shallot and a few leftover carrots, and cooked pasta.  As the pasta was near finished, I heated my pan and added the honey mustard dressing, then the chicken, carrots, and shallot.  As the pasta finished, I added it to the pan, and, when needed, added more dressing.


AMAZING.  Honestly, I want to just have the dressing with pasta for lunch some time.


The reason this works so well is because of the components of the particular dressing.  The main ingredient?  Water.  The second ingredient?  Vegetable oil.  The majority of the rest of the ingredients were things that would not dissipate when heated, meaning that the flavors of the dressing would survive.   As it cooked, the water evaporated, the oils were absorbed, and this helped make the sauce thicken.  Gotta love physics.

My goal with this dish is to try to recreate the salad dressing so I don't feel like it's cheating, plus, I have a feeling it will taste even more fantastic if I do it right.  Oh, and find more ingredients.  Carrots were good, but it needs more.  Suggestions?

Beef and Tomatoes (was Pepper Stuffing)

In an attempt to salvage the good parts of my stuffed pepper recipe, I combined the stuffing mixture sans orzo with beef, and cooked them all together. One of my main concern was not overcooking the beef, as it's something I've done almost every time I have worked with it. 

After everything was in the pan over medium heat, I cooked the dish for intervals of 2 minutes at a time in an effort to watch the beef.  After four minutes had passed, the beef had cooked enough to brown on both sides.  The surprising thing was, however, even though I had heated the pan before adding the food, the food itself wasn't all that hot.  After sampling the beef, it was at serving temperature, at best, which was a little odd. 


The beef was too chewy.   But, overall, it was delicious.  I was scraping my plate for every bit.  Once again, some of the flavor of the original mixture had been lost, but not to the severe amount as baking had done. 

I think if I marinated the beef in the mixture for a few hours, that would help to tenderize it some.  

Any suggestions?

Wednesday, November 3, 2010

Baked Macaroni and Cheese

I have two heroes at this point in my life.  One is Cesar Millan, and the other is Alton Brown.  I've been binging on both of their shows way more than any reasonable person should; who said I was reasonable?

One of the first episodes I watched of Good Eats involved various was to make mac and cheese.  My personal favorite rendition is done quite nicely with Velveeta's Rotini & Cheese (with broccoli!).  Honestly, it puts Kraft's version that I grew up with to shame. 

I was never a fan of the cassarole form of macaroni and cheese, but I don't recall ever actually trying it.  It just looks bad; stiff clumps of wierd smells, almost gelaton with it's jiggle.  But, I'm open minded.  If Alton says that it can be good eats, well, who am I to deny him a try?

I compiled the ingredients that were not already in my kitchen.

1.  Cheese: The recipe on the show says English cheddar, but the one on foodnetwork.com says sharp cheddar.  I'm guessing if it's cheddar, it's ok.  That may have been my first mishap, as I couldn't find anything that was english cheddar, so I chose some cheese that was from England.  It didn't quite turn out to be cheddar, rather, a mild cheese with a distinct kick.  Lesson learned.  CHEDDAR!

2.  Elbow pasta:  This is, admittedly, my least favorite pasta shape.  When I was growing up, I always avoided this shape in the Kraft mac & cheese boxes.  It felt slimier in my mouth, and didn't taste as good.  Alton gives the shape a good case for it's use, claiming that the hole through it and the surface area are just the right size for the right amount of cheese to coat.

3.  Kosher salt (new ingredient of the week!):  Before this purchase, I already had sea salt and table salt. The main differences betweek kosher salt and regular table salt are that iodine is often added to table salt, and the grain size (kosher is larger).  Because of the larger size, it's easier to measure by hand.  Kosher salt isn't actually kosher itself, rather, it is used to make meats kosher.  I

4.  Panko (Also new ingredient!):  Panko is a type of breadcrumb that originated in Japan.  In some dishes, regular breadcrumbs can be a substitute for panko.  Panko is normally used in tempura dishes.

The pasta is cooked, then rinsed in cold water.  Alton claimed this was to stop the cooking process, but my main concern was that all the starches were being washed away down the drain.

A rue is made, and dry mustard, paprika, onion, and a bay leaf are added.  After combined, milk is added.  An egg is tempered into the mixture, and the cheese is folded in.  The sauce is poured into a cassarole dish with the noodles mixed in, topped with cheese and panko. 


Looks alright.  Tasted crappy.  However, this is personal taste.  Jeff informed me that it tasted pretty much like any other baked mac & cheese he's had.  It's good to confirm my taste bud's dislikes.

Tuesday, November 2, 2010

Shells with Sausage, Beans, and Mascarpone, take two

I bought spicy sausage. 

I cooked the spicy sausage.  The color was different from the mild.  The scent was pleasant.  There was a scent in the first place.

I tasted the spicy sausage, awaiting the flavor to come to my mouth.  But alas!  There was no flavor, merely spice.  Damnit.

Ok, so maybe turkey isn't the answer.  Ground beef?  Too easy.  Too much like Hamburger helper.   Pork?  That is what the majority of sausages are made from.  Let's try that next time.


A few other notes:  I used great northern beans instead of cannelini.  Apparently our supermarket has trouble keeping cannelini beans in stock, because this was the second week in a row that they were out.  I also added more oregano in hopes that the dish would be more flavorful; it wasn't.

Orzo Stuffed Peppers

I don't like peppers.  They're bitter.  It's a shame, too, because they're so colorful.

But I always like to transform foods I don't like into a form I find delicious.

Stuffed peppers are a pretty basic concept; peppers in which something is stuffed.  In the recipe I used, the peppers were stuffed with canned whole tomatoes, zucchini, mint, cheese, olive oil, and garlic, along with orzo.  I tasted the mixture before I added the orzo, and it was interesting.  Good interesting.  I was hopeful.

After stuffing the peppers (I used yellow and orange, in hopes that their sweeter nature would work better with my taste buds), they cooked in the oven for an hour. 


They came out attractive enough.  If only that was enough.

Cutting into the pepper, the inner "goodness" spilled out into a lovely mess on my plate.  Jeff tried it a different way, attempting to keep the innards inside the pepper after cutting into it.  Both were relatively successful.  Unfortunately, my first bite proved my fears - everything tasted peppery and bitter.  I have to wonder, why am I surprised at this?

Not only did it taste peppery, a lot of the flavor of the stuffing was lost.  Jeff ate it happily, regardless of peppery taste.  He's a trooper like that.  (Meanwhile, I stopped eating it after about five bites.)

I still think I can use the stuffing mixture, sans pasta, with something else.  Beef, maybe.  Beef would be good.

I created a new folder in my recipe application called "Good Parts, Bad Whole."  Recipes like this one belong there, ones that have parts of good ideas in it that don't work out when completed.  We'll see what happens.

Thursday, October 28, 2010

Shells with Sausage, Beans, and Mascarpone, take one

This week's new ingredient is mascarpone.  Mascarpone is a dessert cheese I've seen used a number of times on competition cooking shows, but had never seen in person.  It was a pain in the butt to find at Meijer, which is why I didn't write this post last week.  Its texture is very creamy, almost frosting-like, and it tastes something close to cream cheese, but more bland.  The cheese itself originated in Italy, first appearing around the 17th century.  The name comes from the word mascara, which is a dairy product made from the whey of another type of cheese.  The most common dish it's used in is called Tiramisu, an Italian cake.  In the dish I made last night, it was used as a component in the sauce, but it can be used raw with fruit and bread.

Another interesting tidbit is that most people pronounce it "marscapone" rather than "mascarpone".  I did so myself until I saw the spelling of it; apparently a lot of tv folk mispronounce it.  Shame on them.

This recipe, especially in comparison to the Savory Beef bowl recipe, is pleasantly simple.  The first thing to be cooked was the pasta.  Normally I don't care for shell pasta (it's difficult to grab with a fork), but the original recipe called for a small type of pasta, and small shell is the only thing at my grocery store that fits that description. 

Next was to cook turkey sausage, removed from casings, on a skillet with onion.  Unwrapping the turkey sausage from the casing was an interesting challenge; the result from the insides was remenicint of ground turkey, while the thing in my hand looked like a broken condom. 

The next ingredients were cannellini beans and oregano.  Cannellini beans are also known as white kidney beans, and have a nutty flavor.  Once the oregano started to cook, the dish became pleasantly fragrant.   Reserved pasta water and the mascarpone were added to create a sauce, and the pasta was added to the dish.


The result was good looking, but bland.  Damnit, turkey!
The most flavorful part of the dish was the garnish of oregano, which I regretted eating afterwards.  Lesson learned.  Despite my bland success with this dish this week, I intend to try again next week with spicy turkey sausage.  (According to my resources, this is more flavorful than spicy.)

Wednesday, October 27, 2010

Savory Beef with Pickled Vegetables

I blog this while there is a tornado warning, which is always a great time to blog.

A side note, I know my goal was to have a new ingredient each week, but life happens.  It's a goal, and I can try at least. This week I'm pretty sure it will happen, considering last week I couldn't actually find the ingredient I wanted to use.

Last night I made a delicious dish that is so complicated I originally had to make a spreadsheet to get organized on the timing.  It involves about five layers of food, which the original instructions instructed to make one by one.  The spreadsheet's purpose was to make sure everything was completed at the same time.

An experiment was conducted last night to prove the spreadsheet was a better way; I've already tried the spreadsheet version three times, so I needed to try the full version. 

The last layer of the dish needed to be prepared first.  Bean sprouts, carrots, and cucumber were to be pickled in the refrigerator while the rest of the dish was cooking.  The oven heated to its lowest setting, bowls are placed inside to heat up.

The first layer that goes in the bowl is short grain rice, cooked and cooled, then browned.  The second layer is a mixture of beef and shiitake mushrooms.  It's important for the mushrooms to be cut (or broken in my case) into small pieces, that way they can cook quickly, and you don't have to overcook the beef trying to finish cooking the mushrooms.  The third layer is garlic and spinach that is cooked until wilted.   The fourth is just an egg cooked sunny side up, and the fifth layer is the pickled vegetables.  Each layer is added on top of the other to the bowl in the oven after completion.

As you can imagine, from that description it is more than complicated to have each of these items done at the same time, but it can be done.  And, for the sake of time, it should be.  The time it takes to cook everything using the spreadsheet, not counting food prep, takes about 30-40 minutes.  Doing each item 1 by one takes about a hour and a half. It's so worth the effort.


Savory Beef with Pickled Vegetables

Ingredients (Serves 2)
1/2 cups bean sprouts
1 carrot, peeled and grated
1/2 cucumber, peeled, halved lengthwise, seeded, and sliced 1/4 inch thick
1/2 cup rice vinegar
1/2 cup short grain rice, rinsed
1/2 cup water
8 ounce steak, trimmed and cut into 1/8 inch thick slices
2 tablespoons soy sauce
6 ounce shiitake mushroom, stemmed and sliced
2 cloves garlic, minced
3 ounces baby spinach
2 eggs
1 1/2 teaspoon sesame oil

Toss the bean sprouts, carrot, cucumber, and vinegar together in a medium bowl.
Press lightly on the vegetables to submerge in the vinegar as much as possible, then cover with plastic wrap and refrigerate for 30 minutes to 24 hours.  Drain when ready to use.
Place oven rack in the middle of the oven, and place two bowls on the rack.  Preheat oven to 200 degrees.
Bring the rice and water to a boil in a skillet over high heat, then cover and reduce heat to low, cook for 7 minutes.
Remove rice from heat and let sit, covered, for 15 minutes.
Return the rice to the skillet over medium high and cook uncovered for 7 to 9 minutes, letting the rice crisp.
Divide rice between bowls in the oven.
Toss the beef and soy sauce together, and heat 2 teaspoons of vegetable oil in a skillet over medium high until just smoking.
Add the beef, soy sauce, and mushrooms, and cook until beef is medium rare.
Divide beef and mushrooms between the bowls in the oven.
Add 1 teaspoon of vegetable oil to the skillet and heat to medium high, and add garlic until fragrant.
Add spinach to the skillet, and cook until wilted; season with salt and pepper, divide between bowls in oven.
Add 1 teaspoon of oil to the skillet, and heat to medium high.
Slide the eggs onto the skillet from opposite sides of the pan, and season with salt and pepper.
Cook until the whites are set, but yolks are still runny, 2 to 3 minutes.
Slide each egg onto the bowl, and remove bowls from oven.
Drizzle bowls with sesame oil, and add pickled vegetables, and serve.

This recipe was adapted from one in the book America's Test Kitchen - Cooking for Two.

Friday, October 8, 2010

Salmon and clam leftovers

This week, I had a plan.  I had a plan to combine two awesome things, and find out if they were awesome together. 

The first awesome thing is salmon, which over the years I have grown to dislike.  The second thing is the pasta and other goodies from the clam recipe that I loved so much. 

Something interesting just happened regarding the salmon.  I was trying to find the recipe where I had made this awesome salmon, but I couldn't find it.  I tracked it in my pictures, and found the date to be September 22nd.  Apparently, I never blogged about it.  The rest of the dish must not have been spectacular.  Very confusing.

Salmon was a fish that my mom would often cook for us when I was little, and I would always drown the dry flakey bits in tartar sauce.  Because of the frequency, I grew out of it and decided not to like it any longer.   The times I have cooked it since I have started cooking I've had mixed results.  On the stove, the salmon has always turned out rediculously dry, even when poached.  I found that broiling the fish yealeded the best and easiest results.  I also learned that pre-frozen salmon is always a terrible idea.  

On the day of the 22nd, I found out one remarkable thing.  All my life, I've been eating overcooked salmon.  Salmon is not supposed to be flakey and dry, it's supposed to be moist, tender, and flavorful.  You shouldn't have to drown out the flavor of the fish with anything, ever, if done right.

The trick is doing it right.

Here it is:  Season with salt and pepper, cook for 2 minutes on each side.  That's it.  Simple.  Delightful.  Tasty.

I made the pasta the same way as was done in the clam recipe, along with forgetting that 1/2 lb of pasta is way too much for two people.  In fact, I'm going to change that in my book right now.

And, back; 4 oz is what it should be.  The main lessons that I have learned from the pasta part of this recipe are that cooking pasta in half water and half chicken broth is always delicious, and that cooking onions in sherry is also delicious. 


As for the true question, whether or not these two awesome things would go together...

Not really.  But they both tasted good individually.  And that's good enough for now.

Thursday, October 7, 2010

Beef Taquitos (aka Taquito Night!)

Long before my days of cooking consistantly, Jeff had a few staple frozen dinners he would consume on a regular basis.  One of these staples was El Monterey's taquitos, either in chicken or beef flavor.  Jeff had a wonderful method figured out for preparing them: microwave them for a minute, then cover them in shredded cheese, then microwave them another minute or so.  After all this, top with salsa, and eat.  Delicious. 

Then came the age of Hamburger Helper, aka introductory cooking, where I was looking for easy recipes to experiment with.  I found a recipe for baked taquitos (I believe they are normally fried), and Jeff and I tried it.  In comparison with the El Monterey taquitos, well, there were no comparison.  These were way better, and likely much healthier.  After a lot of modification, we found that we could make a large batch of taquitos in a night and freeze the rest of them.  Now, we were able to make our own staple, and feel good about it.

Doing this recipe takes both me and Jeff, because I cannot roll taquitos as well as he can.  When we are making the taquitos to freeze, we make a batch of twenty in a night.  First, we cook the onions and ground chuck, and drain the extra fat.  We add "vegetables" (salsa) and spices to the beef, and cook until the flavors mesh together.  After the meat is done cooking, put the beef onto the toritillas, and bake.  Very simple, but time consuming.  And delicious. 


Beef Taquitos (10 Taquitos)
Ingredients:
1 tablespoon vegetable oil
1/2 cup onion, chopped
1 clove garlic, minced
1 lb ground beef
1/2 cup salsa
1 teaspoon chili powder
1/2 teaspoon salt
1/4 teaspoon pepper
10 6-inch flour tortillas
1/2 cup shredded cheese

Preheat the oven to 400 degrees.
Heat the vegetable oil in a large skillet over medium heat.
Add the onion and garlic, cook for 3 minutes, stirring often.
Add the beef and cook until browned; drain.
Stir in the salsa, chili powder, salt, and pepper.
Cook mixture over low heat, stirring occasionally for 10 minutes.
Place 10 tortillas on a plate, and cover them with a damp paper towel.
Microwave tortillas until warm and pliable, about 45 seconds.
Top each tortilla with 1/4 cup of the beef mixture, spreading it in a line slightly off center.
Sprinkle cheese evenly over the beef.
Roll up tortillas and place them on a foiled lined baking sheet.
Brush the taquitos lightly with oil.
Bake them for 8 to 12 minutes.

3 taquitos is a serving size.

To reheat in microwave:
Cook for 1 minutes on high.
Place shredded cheese on top of taquitos, cook for 1 minute 30 seconds.
Top with salsa.

When Jeff and I were making these, we eat some the same night.  Instead of microwaving them, we take advantage of the oven's heat to melt the cheese.  After we are done cooking all of the taquitos, we put our six, topped with cheese, back in the oven for 3 minutes. 

Saturday, October 2, 2010

Poaching Eggs and Eggs Benedict

Jeff and I's special thing to do is to go to IHOP at obscene hours of the morning, where I would get strawberry banana pancakes, no whipped cream, and extra strawberries, and Jeff would get nutella crepes.  One day, Jeff decided to get something different to mix things up: eggs benedict.  Being a person who is not particularly fond of the taste of eggs, I wasn't up to date with different type of egg dishes.  I do like to experiment, even on things I don't like, so I asked for a taste.   The combination of meat, bread, egg, and sauce created a dynamic array of flavors, and I was hooked. 

At home, I looked into creating a version for myself.  I bought English muffins, eggs, and ham (Jeff doesn't like bacon).  The first step was to learn how to poach eggs. 

Poaching Eggs

Ingredients
4 eggs
1 tablespoon white wine vinegar

Pour water into a large tall skillet so the water is at least 1 1/2 inches deep.
Heat the water and bring to 190 degrees.
Add the white wine vinegar.
Gently crack each egg into a different custard cup, being careful not to break the yolk. 
Slowly lower each cup into the water, and gently pour into the egg.
Cook for 4 1/2 minutes, adjusting the heat to maintain the temperature.
Carefully remove the eggs with a slotted spoon, one at a time, to a paper towel lined plate.
Trim the sides of the egg whites with a spoon to clean up the appearance, and serve.

I learned recently through an episode of MasterChef that you can create a poached egg by filling a tall pot with water, spinning the water, and placing the egg in it.  While this might do the job for one egg, my way successfully creates 4 poached eggs at the same time.

The next task was to create the hollandaise sauce.  In the multiple times I have created this dish, I've tried many different versions, but I still haven't found a version I'm satisfied with. 

There are two common ways to create hollandaise, with a blender, or over a double boiler.  The two main components of the sauce are egg yolks, butter, and lemon juice.  The blender version is considerably easier to make;  mix the egg yolks, lemon juice, and other spices into the blender and blend, then add melted butter and mix.  The double boiler version is trickier; mix the egg yolk in a metal bowl over a pot of boiling water, whisking constantly.  Remove the bowl once the egg is the consistancy of whipped cream, and add the butter, lemon juice, and other spices. 

Today I attempted a version of the double boiler, and failed in multiple ways.  I kept the eggs on the boiler too long, and it started to turn into micro scrambled eggs.  I dumped that batch, and started with a new, being careful to not go too far this time.  I'm pretty sure I ended up undercooking them.  The whole batch was super watery, as you can see in the picture coming up.   I'm still seaching for the perfect thick consistancy that I see at IHOP.  Even though the consistancy wasn't right, it still tasted good, which is the most important thing.


Eggs Benedict

Ingredients (2 servings)

4 eggs
4 slices ham
2 English muffins, split in half
spray butter
hollandaise sauce
chives or green onions

Poach 4 eggs.
While eggs are poaching, warm ham in skillet, and lightly toast the English muffins.
Spray butter over the English muffins, top with ham, with one poached egg, and topped with hollandaise sauce.
Sprinkle with chives or green onions, and serve.

Thursday, September 30, 2010

Turkey Spaghetti, take two.


My second attempt at this dish went a lot better than the first, expecially considering I had the right tomatoes.  Everything went smoothly;  the turkey cooked beautifully, the pasta was al dente... But as I was eating it, I couldn't help to notice this craving in the back of my head.  "Beef....this needs beef..." it said.  Every single recipe I've made with ground turkey I have found this to be the case. 

So, while there wasn't anything particularly wrong with the recipe, and I'm sure turkey is healthier than beef, I still want to retry the recipe with just beef. 

Also, every time I make a tomato dish, I have way too much tomato paste left over from the tiny 6 oz can.   I always feel guilty about throwing the rest out, but it would rot in the refrigerator.  Does anyone have any way to save it, without freezing it?  (I find that if I freeze it, I never remember to take it out before I need it.)

Wednesday, September 29, 2010

New Ingredient: Ricotta - Fettucini with Smashed Peas, Sausage, and Ricotta Cheese

In an effort to further my goal, I am going to choose an ingredient each week to both use in a meal and write about here.  This week's new ingredient is Ricotta cheese.

Ricotta cheese can be made from sheep, goat, or water buffalo milk, but is most commonly made from cow milk.  Ricotta literally means "recooked", as it's made from the leftover cheese products like whey.  Its flavor is very mild and slightly sweet, and has a very smooth texture similar to cottage cheese.  When it ages, it turns yellow.

Ricotta is often used in Italian dishes as a filler for pasta like ravioli and lasagna, and is also featured in some Italian desserts.  It can be used as a substitute for mayonnaise.

The recipe that featured this ingredient was from New Italian Favorites, called Tagatelle with Smashed Paes, Sausage, and Ricotta Cheese.  Tagatelle is another word for wide pasta such as fettucini.  Honestly, I couldn't find any other pasta labeled directly as tagatelle both in the supermarket or on Google, so I used fettucini as a substitute.

When I opened up the container of whole milk Ricotta cheese, I was surprised at the consistacy.  It looked like I had opened a giant container of yogurt, as it was completely smooth.  The flavor was pleasant, and I imagine I will use the rest of the large container I bought on some crackers.

The recipe itself was very simple.  Cook the pasta, then some sausage meat (I found a package without the casings, very convenient), smash peas, and add the cheese.  It turned out to be a lovely combination of flavors all mixed together, and it reminded me of something very homey.


Fettucini with Smashed Peas, Sausage, and Ricotta Cheese (Serves 2)

Ingredients:
1/3 lb fettucini
3/4 tablespoon olive oil
1 clove garlic, chopped
1/3 lb Italian sausage, casings removed
1/4 lb frozen peas, thawed
1/3 cup whole milk Ricotta cheese
1/3 cup basil leaves, chopped
1 tablespoon Romano cheese, grated
1/3 teaspoon salt

Bring a pot of salted water to boil.
Add pasta and cook according to directions.
Drain pasta, resserving 1/2 cup of the pasta cooking water.
Heat the olive oil and cook garlic in a large skillet over medium heat until the garlic is fragrant.
Add sausage and cook using a wooden spoon to break it up into bite sized pieces.
When the sausage has browned, about 5 minutes, push it to one side of the pan.
Add the peas tothe pan, and using the spoon, smash the peas.
Turn off the heat and add the ricotta cheese to the pan and stir to combine.
Add the cooked pasta and toss to coat.
Add the pasta cooking water 1/4 cup at a time to make pasta moist, if needed.
Add the basil, Romano, and salt.
Toss gently to combine and serve immediately.

Wednesday, September 22, 2010

Pastina with Clams and Mussels (Kind of fail)

The scariest thing from the pasta chapter of Giada De Laurentiis's book, New Italian Favorites, is the clam and mussel dish. Live shellfish is something I never have had to deal with, so clams are a better place to start compared to lobster.

Jeff doesn't even like the idea of clam looking food, so I saved this for a day where it would just be me at home (once again defying the title of this blog). If it turned out to be good, I would have him try it.

After classes ended for the day, I went to Martins and their glorious seafood selection (no more shark, oddly), picked up 3 clams and 4 mussels. As I was looking them over in the cheap plastic containers, the lady at the counter asked, "You look confused; are you wondering why there are holes on the cap?" "Um....because they're alive?" "Yep!" Thank you seafood counter lady for looking out for me. (Not sarcasm.)

After walking the dogs, I started on dinner. I looked up information on how to clean the shellfish, and began soaking them for 20 minutes. Unfortunately, it appeared that two of the mussels decided to kick the bucket. As instructed by the internet, I tapped them lightly against the counter to make sure they were completely dead. As it turned out, one of them was faking it, and got to be added to the pot of soaking water.

The pastina (small pasta) was to be cooked in a broth and water mixture, then drained after finished cooking.

As for the shellfish pot, onions and garlic were sauteed, then sherry and tomatoes were added to the pot. Finally, the shellfish were added.

This was a milestone for me, as it was the first time I have ever killed something in preparation to eat it. (Plants don't count in my world.) I was worried; what if they all didn't open? Thankfully, my worry was interrupted by one of my dogs deciding to go to the bathroom on the kitchen floor.

After the 7 minutes, everything had opened. Success! Time for plating.

Apparently, clams and mussels are very photogenic.

Pleased with my awkward-to-carry plate, I sampled the meats. And then proceded to spit them out. The mussels tasted a bit better than the clams, but not by much.

Despite the failure, the pasta was delicious. I am going to find something to integrate the pasta into.

To speak honestly, I don't know whether I did something wrong, or if I actually don't like them. I'll keep an open mind if the opportunity presents itself in the future.

However, Jeff, fear not. I wont make you try this dish.

Friday, September 17, 2010

Szechwan (Awesome) Shrimp

One of the staple shrimp dishes I have found over the time I have been cooking is called Szechwan Shrimp. For the longest time, I had no idea how to pronounce Szechwan, so I simplified it to "awesome". I'm pretty sure I could eat two portions or more at one setting.

I've done this dish enough times, that with the exception of the rice, I don't have to use a timer, so the times aren't in the recipe.

For those who don't know how to cook shrimp, it's very simple, and takes about 3 minutes for medium to small shrimp. As the shrimp cook, they turn from translucent purple to a light pink, and will curl up tight. It's important to stir the shrimp as they cook, so they are cooked evenly on both sides. I like to pour the shrimp into the pan, make sure they are all laying on their side, then flipping them individually. Because the shrimp are going to be in the pan while the sauce is cooking, it's important to add the sauce as the shrimp are almost done cooking, so the shrimp wont over cook.

The sauce is made up of odd kitchen staples, such as ketchup, soy sauce, honey, and corn starch. It takes about 3 to 5 minutes for the sauce to thicken.


Szechwan (Awesome) Shrimp (Serves 2)

Ingredients:
1/4 cup water
2 tablespoon ketchup
1 tablespoon soy sauce
2 teaspoons cornstarch
1 teaspoon honey
1/4 teaspoon dried ginger
1/8 cup green onion, sliced
2 cloves garlic, minced
8 ounce shrimp, peeled and deveined

In a bowl, mix water, ketchup, soy sauce, cornstarch, honey, and ground ginger.
Heat 1 tablespoon vegetable oil in skillet.
On medium heat, stir in green onions, garlic, and shrimp.
When shrimp is cooked, add the sauce.
Cook until sauce is thick and bubbly.
Serve over rice.

Friday, September 3, 2010

Chicken Cordon Bleu

Last Thursday, Elizabeth came over, and we were determined to make something to eat. Jeff and I had just bought a new couch, so we're trying to eat cheap for a few weeks; our challenge was to find something that we could make out of what we had, and have it be awesome. And, to write it down.

We decided on Chicken Cordon Bleu, using frozen chicken, leftover cheeses, sliced deli ham, and a bunch of food staples (not office supplies). As our side, we used some small eggplants that were given to me by a friend to make eggplant fries.

Elizabeth and I started on the cheese sauce, which was made from a rue with milk and shredded Colby Jack cheese. We added celery salt, garlic powder, and dill weed as spices, and let it thicken.

We let the poor, frozen (and possibly a little freezer-burnt) chicken thaw, then I pounded it. (I have a pleasing amount of experience with this now!) After seasoning the chicken with salt and pepper, we put the ham on top of the chicken, then a layer of Colby Jack on top of the ham. After the sauce was finished, we put that on top of the layer of cheese, and rolled the chicken onto itself. We brushed egg on top of the chicken, then patted on a layer of breadcrumbs.

We put the wrapped chicken into a pan layered with tin foil, and we baked it at 350 degrees for 30 minutes. After the 20 minute point, we checked the temperature of the chicken to determine whether or not it was cooked, but we found that because the chicken was wrapped, this didn't give an accurate temperature of the chicken.

While we were waiting for the chicken to cook, we experimented with the eggplant fries. Elizabeth sliced the eggplants, and we decided not to skin them (as an afterthought). I found a breading mixture that had high ratings, and we dipped the eggplant slices in that, then dipped them in hot oil until they browned.

As a test, we decided to try them before the chicken was finished. Our first reactions were ecstatic, however my own opinion started to dwindling due to an emerging bitter taste. I did some research later on, and the bitterness could have been from the eggplants not being fresh anymore. Because of my issues with the bitterness, (strangely, Elizabeth didn't have any problems with it), I'm not going to post the recipe here at the moment.


Chicken Cordon Bleu

Ingredients:
2 chicken breasts
1 egg
1/4 cup breadcrumbs
4 slices of ham
1 1/2 tablespoons Colby Jack cheese, shredded

Cheese Sauce:
2 tablespoons butter
1 tablespoon flour
5 tablespoons milk
6 tablespoons Colby Jack cheese, shredded
1 teaspoon celery salt
1 teaspoon garlic powder
1 teaspoon dill weed

Preheat the oven to 350 degrees.

In a sauce pan, melt butter, then slowly whisk the flour into the butter.
Cook until flour and butter are golden.
Slowly add and gently whisk milk, then add the cheese; continue mixing.
Add the celery salt, garlic powder, and dill weed.
Keep on a low heat until ready to use.

Pound chicken breasts to 1/2 inch.
Season the chicken with salt and pepper.
Layer, in order, on top of each chicken: 1 slice of ham, Colby Jack cheese, 2 tablespoons of the cheese sauce.
Roll the chickens onto themselves, encasing the ham and cheese inside them.
Place the chicken breasts onto a pan lined with foil.
Coat the chicken with a thick layer of egg, and pat the breadcrumbs onto the top side of the chicken.
Cook for 30 minutes.

Thursday, August 19, 2010

Cherry Cookies

Last night, at 8PM, Elizabeth and I decided to bake cookies. I'm not entirely sure how this came about, but we decided on a recipe that I copied from my mom that I haven't eaten for at least ten years. I remember the cherry cookies being pretty close to heaven; soft and sweet, with creamy icing. Despite my childhood memories, I had no real idea what they actually were like, nore do I bake often, if ever.

Elizabeth's baking passion is the same as the passion I have for cooking. We're both proud foodies. We were watching the Food Network channel a few nights ago, and a commercial for a pre-cooked frozen meal came up, asking sarcastically, "Who wants to come home to chopping and peeling?" We both raised our hands, realized what the other had done, and laughed.

After we came back from Meijer with our specialty ingredients, we spent the next two hours preparing the dough and icing, and thinking about ideas for the pictures I would take (as it was my first time taking pictures of cookies), along with a few phone calls to confirm things with my mom.


Cherry Cookies

Ingredients:
1/2 cup butter
1/2 cup shortening
1 cup sugar
3 eggs
1/2 cup sour cream
3 1/4 cup flour
1 teaspoon baking powder
1/2 teaspoon baking soda
1 teaspoon salt
1/2 cup chopped maraschino cherries
1 teaspoon vanilla

Preheat oven to 375.
Mix sugar and shortening by cutting with knives continuously.
Add the sugar mixture to a stand mixer, and set on a low setting.
Add butter and eggs.
Stir in sour cream.
Sift dry ingredients and mix well.
Stir in cherries and vanilla.
Spoon on ungreased sheets 2 inches apart.
Cook for 10 to 12 minutes.
Frost when cool.


Frosting:

Ingredients:
2 tablespoons cherry juice
3 tablespoons milk
1 1/2 tablespoons softened butter
2 3/4 cup powdered sugar
1/2 teaspoon vanilla

Mix.

The first thing we had to ask my mom about was cutting the shortening and sugar together. We were told to cut in a criss-cross motion, with the end result resembling snow. When finished baking, the cookies are pink at the top, and slightly brown at the bottom. The icing can be made with individual preference in mind, with regards to both thickness and flavor. You can change how thick it is by adding more powdered sugar to make it thick and goopy or more runny by adding less. The flavor can be adjusted by adding more cherry juice.

I'm definitely not going to wait another 10 years to do this again.

Tuna Parmesan

One night, early in my cooking adventures, I wanted to make a dish with canned tuna. I looked online for some sort of sauce recipe, preferably with cheese. I had some Kraft Parmesan cheese in my refrigerator, and I found a recipe online that was simple enough to try. The sauce started with a rue (a starter for a sauce consisting of butter and flour), then I slowly added milk (to change a rue into a sauce, a cream product is added). I added the powdery Parmesan with a few other spices to the mix, and it came out with the texture of slop. Tasty slop.

This dish ended up being completed with the addition of the tuna, Campari tomatos, pasta, and mushrooms. It was tasty, and it turned into one of Jeff's favorite meals. The only problem I continued having was too large of portions.

In celebration of discovering true Parmesan cheese, and not using the crappy powder, I wanted to rediscover this dish.


Ingredients:
2 tablespoons butter
3 tablespoons flour
1 cup milk
2/3 cup milk
2/3 cup fresh Parmesan cheese, shredded
pinch salt
pinch pepper
pinch paprika
1 can tuna
4 Campari tomatoes, quartered
2 ounces pasta, rotini (or similar sized pasta)
4 ounces mushrooms, sliced

Cook pasta according to directions.

Sauce:
In a different pot, melt 1 tablespoon butter in skillet over medium high heat.
Sprinkle flour into melted butter, whisking constantly.
Cook for 30 seconds to 1 minute or until mixture is golden and lumpy.
Gradually whisk in milk and bring to a boil.
Cook, whisking constantly, 1 to 2 minutes, or until thickened.
Add parmesan cheese, salt, pepper, and paprika, whisking until smooth.

Mushrooms:
Melt 1 tablespoon butter in a skillet over medium heat. Add mushrooms, stir occasionally, until cooked.
Transfer sauce to skillet.

Add tuna, tomatoes, pasta, and mushrooms.
Simmer for five minutes on medium heat.

If I was being quick about this recipe, I would use a can of mushrooms, and add them at the end. Using real mushrooms produces a better result.

Using the real Parmesan cheese yielded a few different changes in the end result. The most significant to me was the taste. The cheese flavor was a whole lot bolder than before. Another interesting note was it lessened the proportions enough where it wasn't overbearing any longer. Wonderful.

Wednesday, August 18, 2010

Stir-fry Shrimp (Kind of fail)

Originally called Spicy Red Shrimp Stir-Fry in the Knack Quick and Easy Cooking book, I've shortened it to Stir-fry Shrimp because I can't handle the spicy. The only thing I had changed was removing the red pepper flakes.

The recipe called for a sauce that was based from cocktail sauce and chicken broth. In continuation of the idiotic 'grabbing without looking' phase I'm in, I found out that the cocktail sauce was a spicy version.

So, I tried making my own. I looked online for the common ingredients: ketchup, horseradish, worcestershire sauce, and lemon juice. Small problem, no idea what horseradish is. Turns out, it's some sort of spice to add heat. The only thing I have close to that is chili powder.

In my courageous way, I decide to make my own blend of cocktail sauce. I started out by adding an even amount of everything. This a terrible idea, mostly because of the chili powder. While it was way too hot for me, I let Jeff taste it, and he enjoyed it.

I made a similar combination with less chili powder and more ketchup, and it tasted like creamy cocktail sauce. I think if I had made a ketchup-like sauce from actual tomatoes, it would have had more texture. But, I got the taste right, and that's what mattered.

The recipe uses frozen stir-fry vegetables, which work wonderfully for simplicity's sake, along with shrimp and fresh onion. Even though the frozen vegi's tate good, I'd like to experiment with a similar combination of fresh.

The only problem I had with the recipe was the aftermath; it tasted fine, but it didn't sit well in my stomach. (I have a sensitive stomach, something I may or may not discuss in a later blog.) Hense, kind of fail.

Thursday, August 12, 2010

Taquito Burgers

Having only another shrimp dish on this week's menu, I asked Jeff if he had any better ideas for dinner tonight. He suggested taquito burgers.

Taquito burgers came to be because his family came to town. Apparently that is constant motivation to perfect a meal. We had made burgers from scratch a few times before, but I wasn't going to settle with good. I wanted freakin awesome.

I grew up eating pre-made frozen patties, so when Jeff and I handcrafted burgers for the first time, I was in awe. Last summer, we tried a few basic recipes, consisting of mixtures with different spices, breadcrumbs, egg, and of course, beef. We also tried using ground turkey once, but I think I enjoy the rich beef taste better.

We ended up finding the perfect burger recipe one night when we were making taquitos. We often have a little leftover meat, and I was eating up the delicious flavor as quickly as I could. Then it occurred to me: this combination of flavors would make an amazing burger. And it did.

On the way home, I had the choice of going to Martins or a family run grocery store that I had passed by more than a dozen times. I chose the more adventurous route. And it was worth it.

This place smelled like my grandma's house, and looked like an Italian restaurant. In short, heaven. They had ground chuck that was ground in the store, from local beef. They had ridiculously huge (and delicious) tomatoes from Michigan, which I'm convinced I would be in heaven if I were to eat them like apples. Freshly baked bread that I sliced to make into buns. Heaven.


(4 Servings)

Ingredients:
1 lb ground beef
1/2 cup mild salsa, lightly strained
1 clove garlic, minced
1/2 cup onion, minced
1 teaspoon chili powder
1/2 teaspoon salt
1/4 teaspoon pepper

Combine ingredients.
Heat grill to 500 degrees.
Cook for 3 minutes on each side, burgers will be fragile.


When we first made the burgers, we didn't strain the salsa, and the burgers were super-fragile. Without those extra juices, the burger is significantly sturdier; but don't be fooled, you still need to be gentle.

Jeff wasn't sold on the fancy buns, he said that they were rather dry. I agreed, but I enjoyed the texture of them. Honestly, even if we used the cheapest buns we could find, I'd still be happy to eat this burger up.

Wednesday, August 11, 2010

Italian Shrimp

Rarely do I make a meal for the first time and be completely happy with it. On top of that, rarely do I make a meal right the first time if it's coming from a new source. Tonight was one of those rare nights where almost everything turned out perfectly. This is, to my own shock, a recipe card post.

Tonights dinner was a recipe card from Meijer, originally called Festive Shrimp Capellini. Capellini is a spaghetti-like pasta, thinner than angel hair. Because of my general frustration with long pasta, I decided to switch out the capellini for penne rigatoni. I changed the name of the recipe to reflect this.

Due to the fact I grabbed the wrong size shrimp (it was a theme in my shopping this week, apparently), the shrimp was a little overcooked. I hope with the correct shrimp size, this will be fixed.

(Serves two)

Ingredients:
1/2 lb medium shrimp, peeled and deveined
1/4 cup Italian dressing
5 oz penne pasta
1 teaspoon olive oil
1 teaspoon butter
3 green onions, thinly sliced
4 cloves garlic, minced
2 tablespoons fresh parsley, chopped
1/2 large tomato, seeded and chopped
1/2 red bell pepper, seeded and chopped
1/2 tablespoon Italian seasoning

Place shrimp in a medium bowl; add dressing.
Cover and refrigerate up to 30 minutes.
Cook pasta according to package directions; drain and return to pot, set aside.
In a large skillet, heat oil and butter over medium high heat.
Add onions, garlic, and parsley; cook and stir 2 minutes.
Add shrimp and dressing; cook until shrimp are opaque, stirring occasionally.
Stir in tomato, bell pepper, Italian seasoning, and salt and pepper to taste; cook and stir until heated through.
Add shrimp mixture to pasta in pot; toss to coat.