Saturday, December 25, 2010

Tuscan Mushrooms

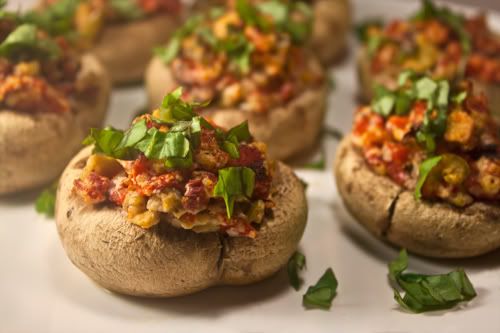
It came to my attention this afternoon that I needed to have an appetizer dish for a Christmas party tomorrow.   I don't know how to do appetizers, I know meals.  Thankfully, I have books that tell me things like this.  I knew that New Italian Favorites had a nice chapter dealing with pre-meal eats, so I flipped through the chapter and looked for a recipe that had three characteristics: it could be served cold or room temperature, it had to be simple, and it had to taste good.  I decided on the Tuscan Mushrooms.

Giada never really explained why these mushrooms were particularly "Tuscan", so I can assume it's the type of ingredients.  The stuffing consists of jarred roasted red bell peppers, green olives (no pits or other junk), Romano cheese, and green onions.  I had never heard of roasted red bell peppers in a jar, so I knew it would be an interesting search in the rush before Meijer closed this evening at 7.  The shopping trip went relatively well, with me only having to ask assistance for basil and the peppers.  There is a constant shortage at my Meijer on fresh basil; as for the peppers, two guys ended up helping me search up and down the isles.  They both knew that Meijer had it in stock, so it was simply a matter of where.  "They don't tell us about when they move stuff; the least they could do is send us an email about it."  I replied, "Well, considering how much stock your store has, I'm pretty sure your inbox would be full very quickly."

The roasted peppers were interesting to dice, as their shape didn't resemble the common bell pepper shape we all know and love; rather, they looked like the body of a cleaned squid.  I chopped up the green olives (which I halved the amount because of my own dislikes) and green onions, and added Romano cheese, salt and pepper, and mixed it all together.  The mixture tasted interesting, with a strong brine flavor.

I purchased mushrooms that were labeled as stuffing mushrooms, thinking these would be more convenient in some way. Really, the only difference between them and regular button mushrooms is the size.  I think I like the stuffing mushrooms better, more room for, you guessed it, stuffing.

I arranged my 7 large mushrooms on a baking sheet, and baked them for 20 minutes.


They turned out looking AMAZING.  I love the colors and textures.  They tasted pretty darn good too.  Jeff and I found that if we sliced them in half, they were more manageable to eat, rather than attempting to control the stuffing with our mouthes while we chewed.  They also looked pretty neat sliced in half, but I didn't get pictures of that.  Maybe next time.

So, we'll see how well they go over at the party tomorrow...fingers crossed.  I hate doing things so very last minute like this, but I'm pleased the mushrooms turned out so well.

Tuscan Mushrooms

Ingredients
1/2 cup jarred roasted red bell peppers, diced
1/4 cup green olives, pitted and diced
1/2 cup Romano cheese, freshly grated
2 green onions, white only, finely chopped
1/2 teaspoon salt
1/4 teaspoon black pepper
14oz white button stuffing mushrooms, stemmed
1/4 cup basil, finely chopped

Preheat oven to 400 degrees; line a rimmed baking sheet with parchment paper.
Mix peppers, olives, cheese, green onions, salt, and pepper in a bowl.
On the baking sheet, arrange the mushrooms gill side up.
Spoon the filling into the mushrooms, mounding it slightly.
Bake until mushrooms are tender, about 20 minutes.
Top with basil and serve.
Thursday, December 23, 2010

Whole Wheat Linguine with Mushrooms, Ricotta, and Lemon, Take 2

I tried the recipe again, this time using shiitake mushrooms in the place of the green beans.  Certainly nowhere near as colorful as a photo.


Unfortunately, it wasn't as flavorful either.  The shiitakes added a woody flavor to an already woody dish.  It really made me appreciate what green beans added to the dish.  I think if I added button mushrooms rather than shiitakes it could add a brighter flavor.  It will be something to try.

Peppermint Ice

One of the traditional holiday things my mom would do is to make a type of candy I favored called peppermint ice.  It's essentially a peppermint bark, but I didn't know what bark (in the food sense) was back then.  For the past few years, I've made batches of these wrapped up in pretty paper to give to my department at school, and everyone (except you, Steve) seems to really like it.

For this year's batch, I was determined, for the sake of record keeping, to create a more accurate recipe card.  The two ingredients that are used to create this bark is white chocolate and "starlight kisses", which are little mints that are striped with red.  The packages I've found are labeled starlight mints.  The recipe asks for 2 pounds of white almond bark candy.  A more accurate ingredient is white baking chocolate, which is available in the baking isle.  All they have is white or milk chocolate, nothing labeled anything to do with almonds.  Next, the recipe calls for 2 packages starlight kisses.  That's...vague.  So, I called up my mom to ask how much 2 packages was supposed to be.  She told me that it was however much I felt like putting in.  Not exactly helpful, but better than nothing; it simply meant I had to guesstimate and improve from there.  I decided to use a ratio of 8.5 oz of mints to 1lb of chocolate (the package I had leftover from last year was 8.5oz, so it was convenient).

The first step was to "crush the peppermint candy into fine pieces".  I prefer using a food processor, or a blender.  After about 10 seconds of really loud pulsing, the mints are pulverized into a powder, which if you take off the lid too quickly, the particles can go into the air, and it's not fun to breath in peppermint dust.  (I speak from experience.)  I like some chunks in my candy, so I don't pulverize the mints completely.  I usually have to fish out some of the bigger chunks and save them for the next batch to be blended.

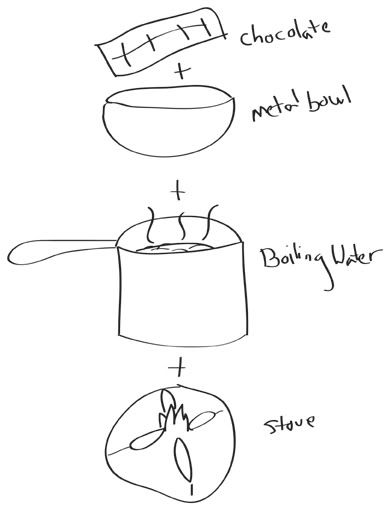
The next step is to melt the chocolate.  On the package there are usually instructions for melting in the microwave, which is what my mom did.  It's certainly an easier route, but I like using a double boiler to melt it.  I feel more involved that way.

I made a diagram to help explain how a double boiler works:


I melted the chocolate until it came to an amazingly creamy consistency.  At this point, there's the option to add a few drops of red food coloring, however I think that the light pink hue that the mints give the chocolate is plenty.  (And my red food coloring has gone missing, so I had to settle for not adding any.)  Now it was time to add the peppermint.  I found that it was easier to mix it in batches, somewhat like adding flour when making cookies, and then folding it in to the chocolate until well combined.  Then, after placing a sheet of wax paper on the counter, I poured the chocolate onto the sheet.  Using a spatula, I smoothed the chocolate out as thin as I can.  I've found that if I don't put effort into spreading the chocolate thin, it's really difficult to break after it hardens.  

Then, I waited two hours.  

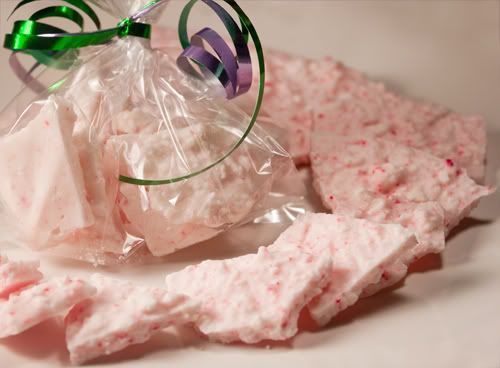
When the chocolate hardened, I broke it into as small of pieces as I could manage without it being crumbs.  Then, I took this picture.


See?  Nice pink color, no food coloring needed.  

One of the other things I experimented with (I had to make 4lbs of the stuff, so I had the chance) was comparing whether it was easier to work with 2lbs of chocolate or 1lb at a time.  Not surprisingly, working with 1lb was the better option, although more time consuming.  

Peppermint Ice

Ingredients (makes approx. 21oz)
1lb white baking chocolate
8.5oz starlight mints

Pulverize the mints in a food processor or blender.
In a double boiler, melt the chocolate, stirring frequently.
Stir in the peppermint powder, and then pour the mixture onto a sheet of wax paper on a flat surface.
Let the candy harden for 2 hours, then break into small pieces.

Tuesday, December 21, 2010

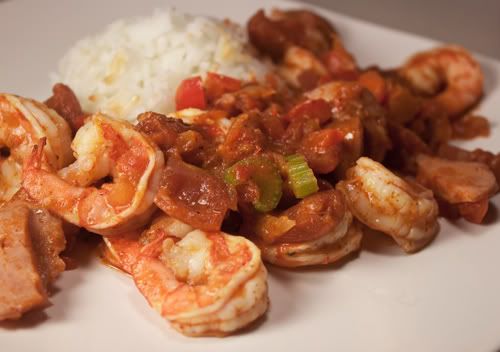
Kielbasa and Shrimp Creole

Lots of new things with this recipe (which was taken from a Meijer card), both good and bad.  I got to work with two new things, kielbasa and creole.  Kielbasa is a type of Polish sausage, often packaged in a U shape.  Creole is a type of cuisine that originates from Louisiana, and takes concepts from French, Portugese, Spanish, African, and Native American cuisine.  Unfortunately for me, it's also known for being spicy.  Knowing this, I went light on the spicy spices the recipe called for.

The majority of the ingredients (kielbasa, onion, green bell pepper, celery, and spices), are cooked for 4 minutes, then I added the tomatoes, and brought the mixture to a boil.  I added the shrimp, and let it cook in the sauces, then served it over rice.  Nice and simple and sweet.


Except it wasn't sweet, it was still freakin' hot.  

My issue with spicy food is that I can't actually taste the food I'm eating, because my tongue is being burnt off.  I know I could get my senses used to the heat, but I don't care to spend the time on that, also considering spicy doesn't sit well with my stomach.  Anyways, I imagine if I could actually taste this dish it would be delicious.  I'm planning on retrying the dish without any spicy spices.

Monday, December 20, 2010

Rigatoni with Vegetable Bolognese

Another recipe from New Italian Favorites, featuring a vegetarian option with dried porcini mushrooms, carrots, onions, peppers, and red wine.  This was also the first recipe where I was able to use a newly purchased food processor!  In my experimentation with how to use it, I was determined to chop everything in this recipe with it.  I failed.

The recipe called for chopped thyme and oregano; unfortunately, herbs in such small quantities don't have enough weight for the spinning blades to actually chop them.  Luckily, the vegetables that the recipe called for chopping chopped fine, if not a little too fine.  One of the things I noticed consistently was that the food processor chopped everything into salsa-like bits, which is great...if you're trying to make salsa.  However, since I'm not making salsa, it's kind of a problem.

One of the new ingredients of which I had the pleasure of cooking with was dried porcini mushrooms.  They smelled like dog food, and when I soaked them in water as per instructions, it made the smell worse.

After all the prep, I cooked the vegetables and herbs until they were soft and tender.  Then, I added the drained porcini mushrooms and fresh mushrooms, and continued to cook.  Then, to complete the sauce, I added the mushroom liquid and red wine.  The dish was complete by mixing in pasta.


The taste of the vegetable mix was very interesting (the good kind of interesting).  I want to retry this recipe, but not using the food processor, so I might be able to taste more of the individual ingredients; otherwise, it's pretty close to being a final recipe for me.

Monday, December 6, 2010

Meatloaf, Take 2.

So, I looked on food.com (was recipezaar.com once), and looked through some of their most popular meatloaf recipes.  One of the things I have learned to do with online recipes is to not only search by ratings,  but to read a good number of the comments.  The comments often provide information regarding substitution, timing, even temperature variations that might be relevant.  Plus, there's the whole thing about opinions.  The meatloaf I ended up choosing was one that was baked for an hour and a half.  A long time, compared to the ten or twenty minute microwave meatloaf, but I had to be fair and follow directions before I modify.  The spice list on this thing was hefty, but promising.  Onion, parsley, worcestershire, chili powder, sage, and garlic powder.  And, the normal breadcrumbs compared to my quirky rice crispies.  It was also coated in a glaze of ketchup and brown sugar.

So, an hour and something later...


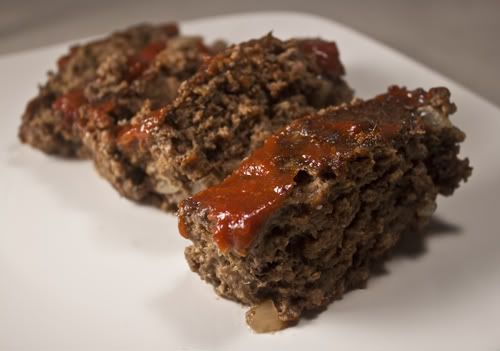
Pictures of meatloaf are difficult.  Attractive pictures, doubly so.  I do believe I improved from the previous meatloaf, if nothing else.

In preparation, I grabbed the salsa bottle if we needed an additional moisture component.  To my surprise, we didn't!  The taste was pretty darn magical...for a meatloaf.  Very moist, and the glaze added incredible flavor as well.  Now, the thing I want to know, is if I can create the same result with the same recipe, only microwaved.  Stay tuned.

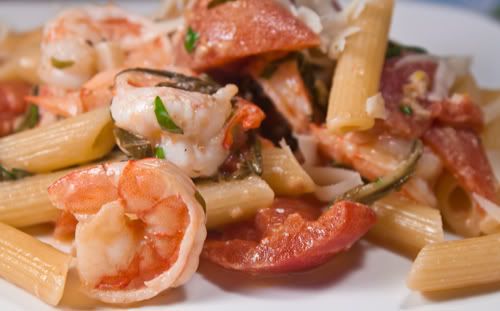
Penne with Shrimp and Herbed Cream Sauce

Being another recipe from New Italian Favorites, I had high hopes for it.  I've been having a lot of luck with the dishes presented in the book, and I haven't even gone past the pasta section yet.  And, it's hard to go wrong with shrimp dishes.

The first thing to do, of course, was to cook the pasta.  Then, cook the shrimp with some garlic, and remove.  Then, I added canned tomatoes, basil, parsley, and a pinch of red pepper flakes and cooked.  After those were simmering, I added red wine, clam juice, and cream, and waited until the mixture came to a boil.  I let it simmer for about ten minutes, then added Parmesan cheese, the shrimp, and the pasta to the dish.

I've previously learned when I am cooking shrimp dishes where the shrimp will be cooked with the sauce after the initial cooking, I'll leave the shrimp partially uncooked.  That way, when they heat up in the pan again, they also finish cooking to the perfect amount, rather than being overcooked.  That's what I should have done with this.


The end result tasted good, but there was a lack of unity between the shrimp and the rest of the flavors.  The only way I can think of fixing this is to completely cook the shrimp in the sauce at the end of the cooking.  I'll give it a try.